Inference Servers on the GPU Cluster
An inference server loads a model onto a GPU once, then answers requests over HTTP for as long as the job runs. Instead of paying the model-loading cost on every script invocation, you submit one Slurm job that holds the GPU and serves an HTTP endpoint, then point as many clients at it as you like — a notebook, an R session, a batch of analysis scripts, or your laptop.
Most of the servers documented here expose an OpenAI-compatible API, so any client library that talks to OpenAI can talk to your server by changing the base URL.
Never run a server on a login node
Login nodes are shared by everyone and have no GPUs. A server process started there will be killed. Always request a GPU through Slurm first, as shown below.
The workflow is the same regardless of which framework or access method you choose:
- Pick hardware that fits your model.
- Submit a job that starts the server.
- Find the node and port it landed on.
- Connect a client.
- Cancel the job when you're finished.
Before you start
You need an allocation on the gpu cluster. If jobs sit in PD state with reason
AssocGrpBillingMinutes, you have no service units to draw from — request an allocation with a
Service Request Form.
Model weights are large and your home directory has a 75 GB quota, so send downloads elsewhere before you start. The variable to set depends on the framework:
| Framework | Cache variable | Covers |
|---|---|---|
| vLLM | VLLM_DOWNLOAD_DIR |
Weights, plus the compiled-kernel cache in a vllm-cache/ subdirectory |
| llama.cpp | LLAMACPP_DOWNLOAD_DIR |
Downloaded GGUF files |
| Ollama | — | Models go to ~/.ollama/models; see the Ollama page |
export VLLM_DOWNLOAD_DIR=/vast/<group>/$USER/vllm
Use your group's /vast (our recommendation) or /ix1 space for weights you'll reuse, or $SLURM_SCRATCH for
one-off experiments. See Storage Tiers and
Scratch Space.
Gated models on Hugging Face (the Llama family, for example) require you to accept the license on
the model's page and supply a token (keep this info private and secure; treat it like a password). For vLLM, pass it as VLLM_HF_TOKEN:
export VLLM_HF_TOKEN=hf_xxxxxxxxxxxxxxxxxxxx
Alternatively, run huggingface-cli login once in the shell before loading the module. Keep the
token out of scripts you commit or share.
Step 1. Choose hardware for your model
Weights in 16-bit precision occupy roughly 2 GB per billion parameters, and the KV cache for in-flight requests needs headroom on top of that. Plan on filling no more than about 80% of a GPU card's VRAM with weights.
| Model size (16-bit) | Approx. weights | Fits on | Slurm directives |
|---|---|---|---|
| 7–8 B | ~16 GB | 1× L40S | -p l40s --gres=gpu:1 |
| 13–14 B | ~28 GB | 1× L40S | -p l40s --gres=gpu:1 |
| 30–34 B | ~68 GB | 1× RTX PRO 6000, or 2× L40S | -p rtx6k --gres=gpu:1 |
| 70 B | ~140 GB | 2× RTX PRO 6000, 4× L40S, or 1× H200 | -p rtx6k --gres=gpu:2 |
| 100 B+ | 200 GB+ | 8× H200 or 8× A100 80 GB NVLink | -p h200 --gres=gpu:8 |
Quantized weights (AWQ, GPTQ, 8-bit, or GGUF) cut these figures by half or more, which often moves
a model down a tier. Full per-partition specifications, including the --constraint values for
pinning a specific card or host CPU, are on the GPU cluster page.
Multiple cards need to be told to cooperate
Requesting --gres=gpu:4 does not by itself spread a model across four cards. Each framework
has its own flag — --tensor-parallel-size for vLLM, --split-mode for llama.cpp. Set it to
match the number of GPUs you requested. For models spanning many cards, the h200 and
a100_nvlink partitions connect their GPUs with NVLink and will outperform PCIe partitions.
Step 2. Launch the server
Ready-to-run templates are installed on the cluster. Copy a template to your own space and edit it:
cp /software/rhel9/manual/install/inference-templates/vllm/vllm_l40s.slurm ~/my_server.slurm
The annotated versions below show what each template does, so you can adapt them.
High-throughput serving with continuous batching and an OpenAI-compatible API. This is the default choice for serving a Hugging Face model to more than one client.
Loading the vllm module starts a server. There is no separate launch command. The module
reads its VLLM_* settings once, at load time, chooses a free port itself, and exports the
address it picked. It also refuses to load outside a Slurm allocation, so you cannot start one
on a login node by accident.
For interactive work, the commands below can be executed on the terminal commandline:
srun -M gpu -p l40s -n16 --gres=gpu:1 -t 8:00:00 --pty bash
mkdir -p ~/.cache/huggingface        # first time only; always bound, even with VLLM_DOWNLOAD_DIR set
export VLLM_MODEL="meta-llama/Llama-3.1-8B-Instruct"
export VLLM_DOWNLOAD_DIR=/vast/<group>/$USER/vllm
module load vllm/0.29.0
vllm-status                      # readiness; large models take a few minutes
curl "$VLLM_BASE_URL/v1/models"
The module leaves $VLLM_BASE_URL, $VLLM_HOST, $VLLM_SERVER_PORT, $VLLM_LOGFILE, and
$VLLM_PID in your shell, and gives you vllm-status and vllm-stop. Full reference:
Using the vllm module.
For a long-lived server you want a batch job instead, which needs two things the interactive path gets for free — a way for clients to discover the port, and something to stop the script from exiting:
#!/bin/bash
#SBATCH --job-name=vllm_server
#SBATCH --cluster=gpu
#SBATCH --partition=l40s
#SBATCH --nodes=1
#SBATCH --cpus-per-task=16
#SBATCH --gres=gpu:1
#SBATCH --mem=120G
#SBATCH --time=8:00:00
#SBATCH --output=%x_%j.out

# Every VLLM_* export must come before the module load
export VLLM_MODEL="meta-llama/Llama-3.1-8B-Instruct"
export VLLM_DOWNLOAD_DIR=/vast/<group>/$USER/vllm
export VLLM_API_KEY="$INFERENCE_TOKEN"        # closes the endpoint
export VLLM_EXTRA_ARGS="--tensor-parallel-size 1"

module purge
module load vllm/0.29.0

# Publish the port the module chose, so clients elsewhere can find it
scontrol update JobId="$SLURM_JOB_ID" Comment="$VLLM_SERVER_PORT"

# Hold the allocation open: the server runs in the background, so if this script
# reaches the end, SLURM ends the job and the server goes with it
while kill -0 "$VLLM_PID" 2>/dev/null; do sleep 60; done
The installed templates add readiness polling and per-job API key generation around this skeleton.
Exports have to precede the module load
VLLM_MODEL, VLLM_DOWNLOAD_DIR, VLLM_EXTRA_ARGS, and VLLM_HF_TOKEN are read at load
time only. Setting one afterward changes nothing until you module unload vllm and load it
again. With no VLLM_MODEL set you get facebook/opt-125m, a tiny model whose only
purpose is to prove the plumbing works.
Anything vLLM itself accepts can go in VLLM_EXTRA_ARGS, including
--tensor-parallel-size for multiple GPUs, --max-model-len, and
--gpu-memory-utilization.
Tool calling needs extra flags
An agent client that wants the model to call tools needs --enable-auto-tool-choice and a
--tool-call-parser matched to the model's family. There is no safe default — the wrong
parser produces garbled tool calls rather than a clean error. The
claude-code module injects both for you; set them yourself through
VLLM_EXTRA_ARGS if you are building your own agent.
Serving a model already staged on disk. VLLM_MODEL also accepts an absolute path.
A value starting with / is detected automatically: the module binds that directory into
the container and forces offline mode, so nothing is downloaded and no HuggingFace token is
needed even for a gated model.
export VLLM_MODEL="/software/rhel9/manual/models/llama-3.1-8b-instruct"
module load vllm/0.29.0
Prefer a staged model when one exists. It starts faster, needs no network, doesn't consume
your storage quota, and sidesteps license gating. Set VLLM_OFFLINE=1 to force offline mode
for a repo id as well.
Pointing at the right folder
If you stage a model yourself with huggingface-cli, use --local-dir. A plain
download leaves the files nested under models--org--name/snapshots/<hash>/, and
VLLM_MODEL needs that innermost directory, not the top of the cache. A missing
config.json warning in the log is the symptom of pointing one level too high.
Simplest option for interactive experimentation and for pulling community models by name. Lower throughput than vLLM under concurrent load, and no authentication.
Ollama is installed as a Singularity image with ready-to-submit batch templates, one per partition:
sbatch /software/rhel9/manual/install/ollama/ollama-0.11.10_l40s.slurm
| Template | Partition | GPU |
|---|---|---|
ollama-0.11.10_l40s.slurm |
l40s |
1 × L40S, 48 GB |
ollama-0.11.10_a100_80gb.slurm |
a100_nvlink |
1 × A100, 80 GB |
Each picks a free port, publishes it to the job's Comment field, and runs the server in the
foreground for the job's four-hour walltime. Copy one to your own space to change the walltime
or partition.
Models download to ~/.ollama/models, against your 75 GB home quota. Pull them from your
client rather than from a separate session, and see the Ollama page for the R and
Python clients, model management, and the quota.
Best fit for quantized GGUF models, including running a large model on a single smaller card. Very low startup latency, and it ships a browser chat interface.
Loading the llamacpp module starts a server, the same way the vllm module does. It
picks a free port, exports $LLAMACPP_BASE_URL, and gives you llamacpp-status and
llamacpp-stop. It refuses to load outside a Slurm allocation or without a GPU.
For interactive work:
srun -M gpu -p rtx6k -n16 --gres=gpu:1 -t 8:00:00 --pty bash
export LLAMACPP_MODEL="ggml-org/gemma-3-4b-it-qat-GGUF:Q4_0"
module load llamacpp/0.5.0
llamacpp-status                  # READY, STARTING or DOWN
echo $LLAMACPP_BASE_URL
LLAMACPP_MODEL takes any Hugging Face GGUF repo in repo:tag form, where the tag selects the
quantization — use the form shown on the model's Hugging Face page. Full reference:
Using the llamacpp module.
Once llamacpp-status reports READY, the endpoint works from anywhere on the cluster. Note
that model is optional in the request body, since the server has only one loaded:
curl "$LLAMACPP_BASE_URL/v1/chat/completions" \
  -H "Content-Type: application/json" \
  -d '{"messages": [{"role": "user", "content": "Hello!"}]}'
For a long-lived server, use a batch job. There is no $LLAMACPP_PID, so readiness and
liveness both go through llamacpp-status:
#!/bin/bash
#SBATCH --job-name=llamacpp_server
#SBATCH --cluster=gpu
#SBATCH --partition=l40s
#SBATCH --gres=gpu:1
#SBATCH --cpus-per-task=16
#SBATCH --mem=120G
#SBATCH --time=8:00:00
#SBATCH --output=%x_%j.out

export LLAMACPP_MODEL="ggml-org/gemma-3-4b-it-qat-GGUF:Q4_0"
export LLAMACPP_DOWNLOAD_DIR=/vast/<group>/$USER/llamacpp
export LLAMACPP_EXTRA_ARGS="-c 16384 -np 4"

module purge
module load llamacpp/0.5.0

until llamacpp-status | head -n1 | grep -q '^READY'; do sleep 10; done

# Publish the port; only LLAMACPP_BASE_URL is exported, so split it out
HOSTPORT="${LLAMACPP_BASE_URL#http://}"
scontrol update JobId="$SLURM_JOB_ID" Comment="${HOSTPORT##*:}"

while llamacpp-status | head -n1 | grep -qE '^(READY|STARTING)'; do sleep 60; done
-c sets the context window and -np the number of concurrent request slots; anything
llama-server accepts can go in LLAMACPP_EXTRA_ARGS. For a local .gguf file, set
LLAMACPP_OFFLINE=1 alongside an absolute path in LLAMACPP_MODEL.
This server is unauthenticated, and accepts any origin
llama.cpp logs it at startup: no API key is set and CORS allows all origins. Any user
anywhere in the CRCD environment who finds the host and port can send requests that bill
against your allocation. Keep these jobs short and cancel them when you finish. Use vLLM
with --api-key for anything long-lived.
Avoid preemptible partitions for servers
A preempted job takes your endpoint down mid-request. Run servers on regular partitions. See Preemptible Partitions.
After you have adapted the template to your liking, submit the job to Slurm:
sbatch ~/my_server.slurm
Step 3. Find the host and port
Your server lands on whichever node Slurm assigns, on a port chosen at random when the job
starts. The launch templates publish that port in the job's Comment field, so one squeue
call tells you both halves of the address:
squeue -M gpu --me --states=R -h -O JobID,NodeList,Comment
1230409 gpu-n56 53021
Read that as: job 1230409 is serving on gpu-n56:53021. Anywhere inside the CRCD
environment, that host and port is the base address of your server.
Save it to a variable
With a single server job running, read the host and port straight out of squeue. Add
--name=<job name> if you have several jobs and need a specific one.
read -r NODE PORT < <(squeue -M gpu --me --states=R -h -O NodeList,Comment)
export BASE_URL="http://${NODE}:${PORT}"
Step 4. Connect a client
Cross-cluster access is intentional and ports are open within the CRCD environment, so a server on
the gpu cluster is reachable from HTC, SMP, OnDemand sessions, and login nodes without any
tunneling. Choose the tab matching where your client runs.
From a login node or any interactive job, check that the server is up:
curl -s -H "Authorization: Bearer $(cat ~/.crcd_inference/token_1230409)" \
     http://gpu-n56:53021/v1/models
Drop the header if you started the server without an API key.
Then use it from Python:
from pathlib import Path
from openai import OpenAI

client = OpenAI(
    base_url="http://gpu-n56:53021/v1",
    api_key=open(f"{Path.home()}/.crcd_inference/token_1230409").read().strip(),
)

resp = client.chat.completions.create(
    model="meta-llama/Llama-3.1-8B-Instruct",
    messages=[{"role": "user", "content": "Summarize this abstract: ..."}],
)
print(resp.choices[0].message.content)
This is the pattern to use for batch analysis: submit your server once, then submit many lightweight CPU-only jobs on HTC that all query the same endpoint. Those client jobs need no GPU, so they queue quickly and cost far less.
Launch Jupyter from the OnDemand dashboard at
ondemand.htc.crc.pitt.edu. An HTC session is the right
choice and the cheap one: the GPU work is happening in your server job, so the notebook needs
no GPU of its own. It will also refuse to host a server itself, since the vllm module
requires a visible GPU.

The default Python 3 (ipykernel) kernel does not include the openai package, so a client
cell fails before it ever reaches your server:

This is a kernel problem, not a server problem. Build a virtual environment with the client library in it and register it as a Jupyter kernel. You only do this once per account.
One-time setup: a kernel with the openai package
Open a terminal inside JupyterLab from the Launcher, under Other. This gives you a shell on the same node your session is running on.

Create the environment and install the client. Build the venv with the same Python the
session is using — module list will show it — so the kernel stays compatible. Put it
somewhere persistent such as ~/envs, not in scratch.
module list                                  # confirm the session's Python
python3 -m venv ~/envs/openai-env
source ~/envs/openai-env/bin/activate
pip install openai ipykernel

Register it as a kernel. ipykernel is what makes the environment visible to
JupyterLab:
python -m ipykernel install --user --name openai-env \
       --display-name "Python (openai-env)"

Refresh the browser tab. "Python (openai-env)" now appears in the Launcher and in the kernel picker of any open notebook. Select it for your notebook, or switch an existing notebook with the kernel selector at the top right.

Later sessions need none of this — the registered kernel persists. Reactivate the venv in a
terminal only when you want to pip install something more into it.
With that kernel selected, point the client at the address from Step 3:

from openai import OpenAI

client = OpenAI(
    base_url="http://gpu-n56:53021/v1",
    api_key="EMPTY",        # or the contents of your token file, if the server has one
)

resp = client.chat.completions.create(
    model="meta-llama/Llama-3.1-8B-Instruct",
    messages=[{"role": "user", "content": "Where is the University of Pittsburgh?"}],
)
print(resp.choices[0].message.content)
Note the two halves: the notebook is on an HTC node, the server is on gpu-n56. Cross-cluster
access is what makes that work.
The server's variables are not in your notebook
$VLLM_BASE_URL and friends exist only in the shell of the server job. A notebook kernel
inherits nothing from them — and environment variables you export in a JupyterLab terminal
do not reach an already-running kernel either. Either paste the address in, or have the
notebook look it up:
import subprocess
out = subprocess.run(
    ["squeue", "-M", "gpu", "--me", "--states=R", "-h", "-O", "NodeList,Comment"],
    capture_output=True, text=True).stdout.split()
base_url = f"http://{out[0]}:{out[1]}/v1"
api_key must be a non-empty string even when the server has no key set, which is why vLLM's
convention is the literal "EMPTY". If you started the server with --api-key, read the value
from the token file named in the job's output instead.
See Jupyter on OnDemand for session options.
Launch RStudio Server from the OnDemand dashboard at ondemand.htc.crc.pitt.edu. As with Jupyter, an HTC session is the right choice and the cheap one: the GPU work happens in your server job, so the R session needs no GPU of its own.

A stock R installation has nothing that can talk to an OpenAI-compatible endpoint, so a first
attempt fails at the library() call rather than at the server:
library(ellmer)
#> Error in library(ellmer) : there is no package called 'ellmer'
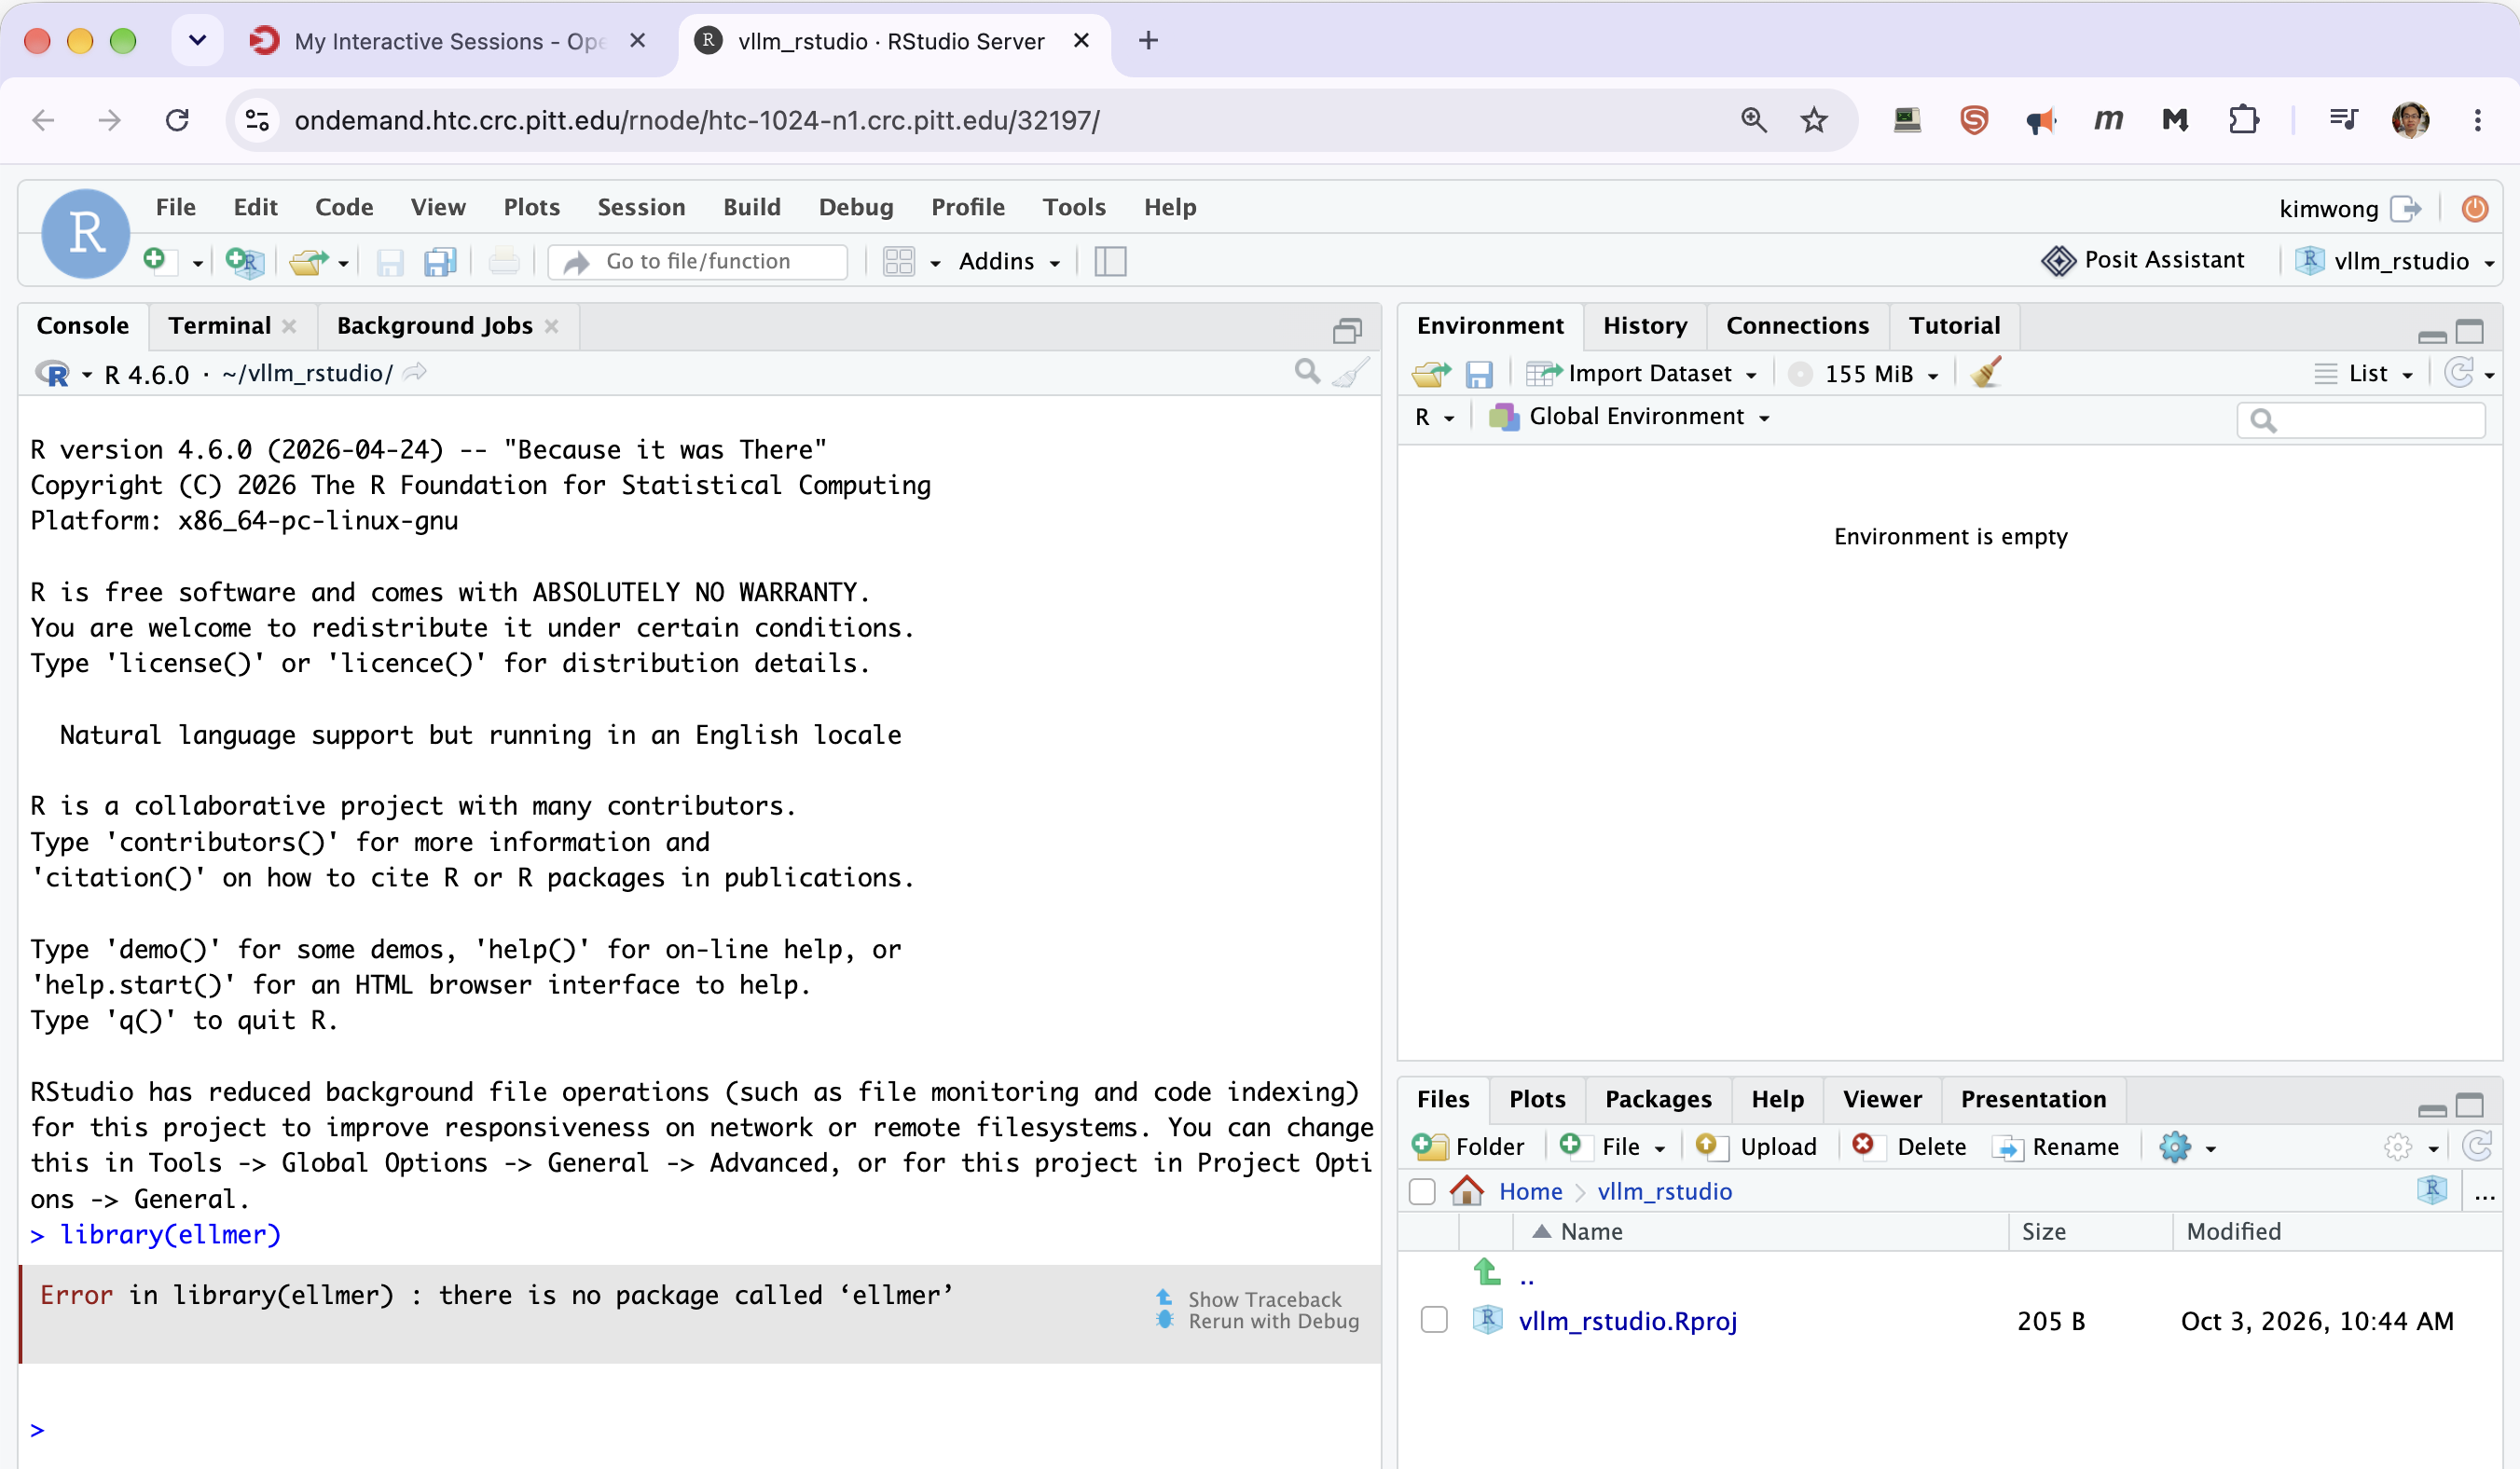
As with the Jupyter kernel, this is a client-side problem. Install a client package once and every later session has it.
One-time setup: installing an R client package
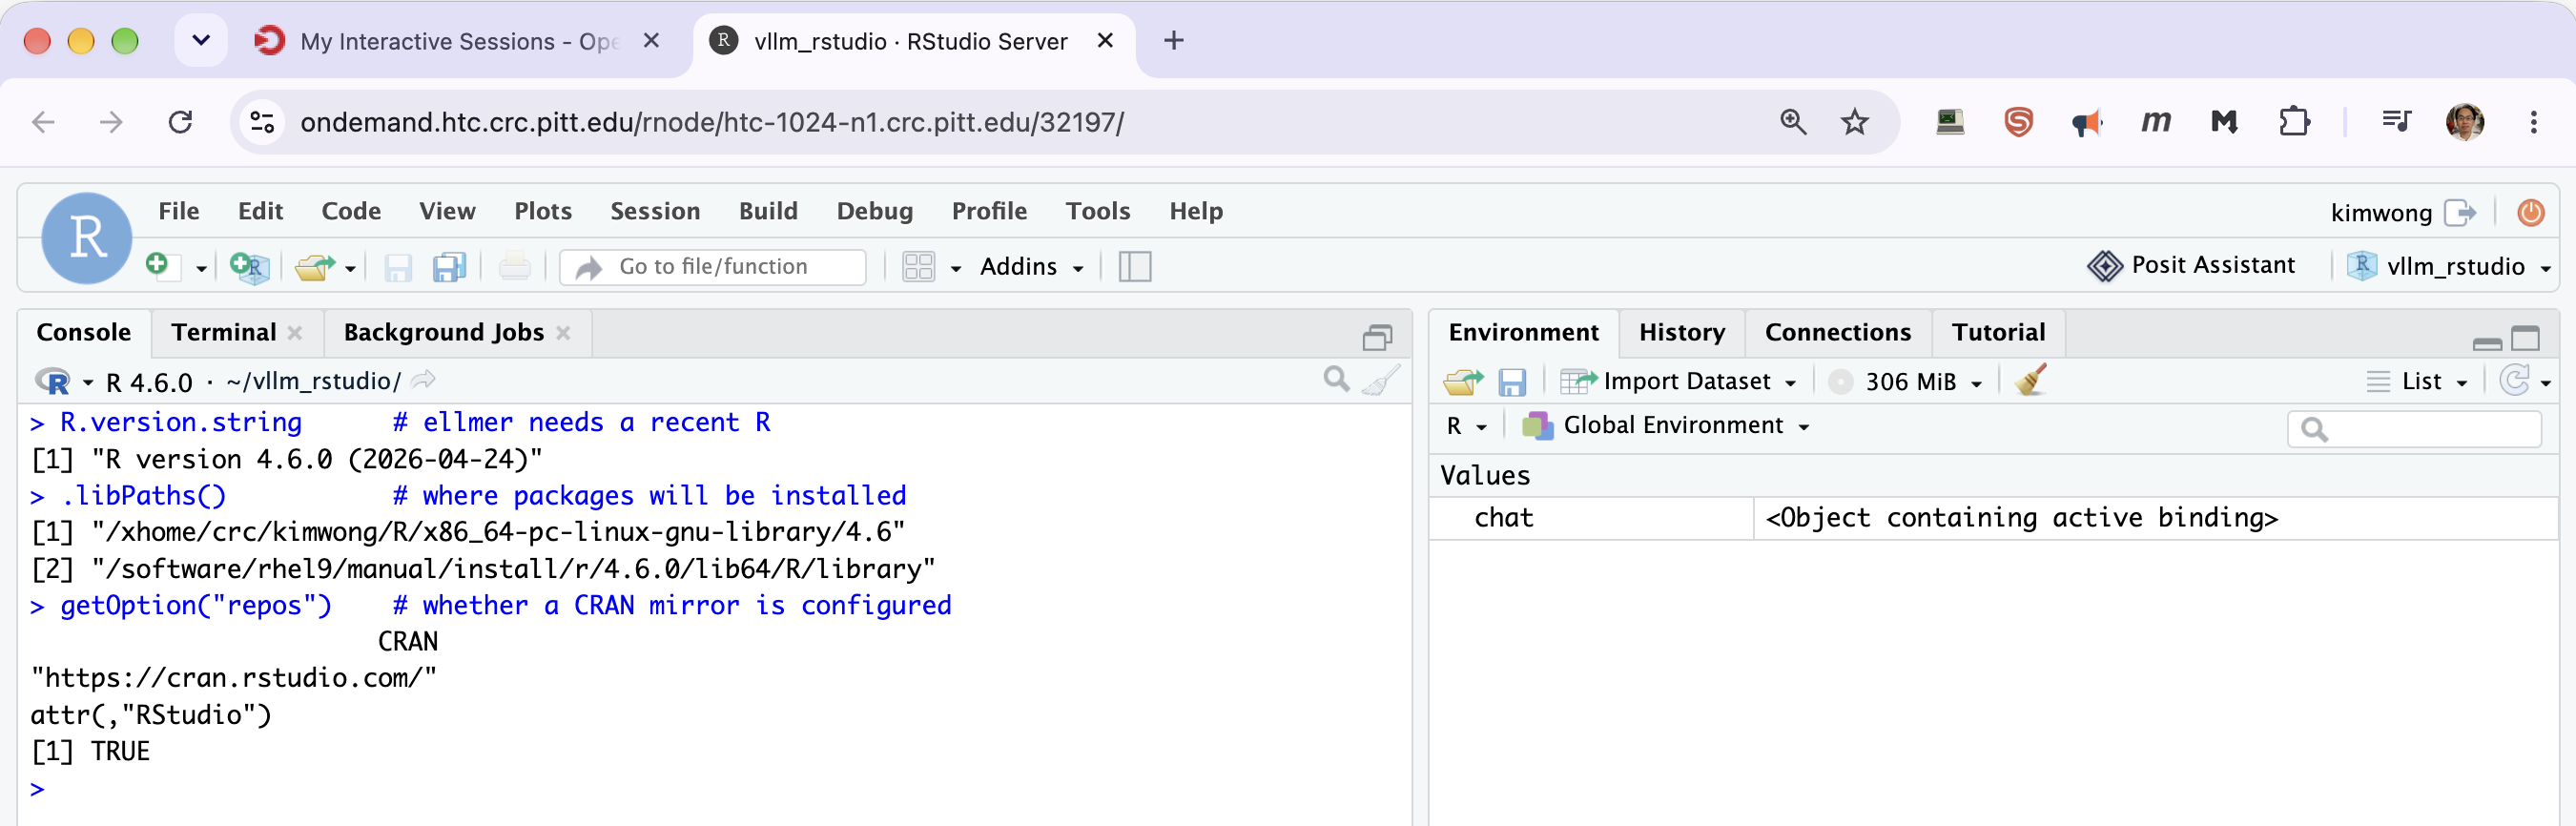
Check your session first. Run these three in the Console before installing anything:
R.version.string      # ellmer needs a recent R
.libPaths()           # where packages will be installed
getOption("repos")    # whether a CRAN mirror is configured
.libPaths() returns two entries: your personal library under your home directory, and the
site library that ships with the R module, for example
[1] "/xhome/<group>/<username>/R/x86_64-pc-linux-gnu-library/4.6"
[2] "/software/rhel9/manual/install/r/4.6.0/lib64/R/library"
Installs land in the first one. Note the trailing 4.6: the path is tied to the R version, so
a session running a different R will not see packages installed under another. If you later
switch R versions, reinstall.
Install the client.
install.packages("ellmer")
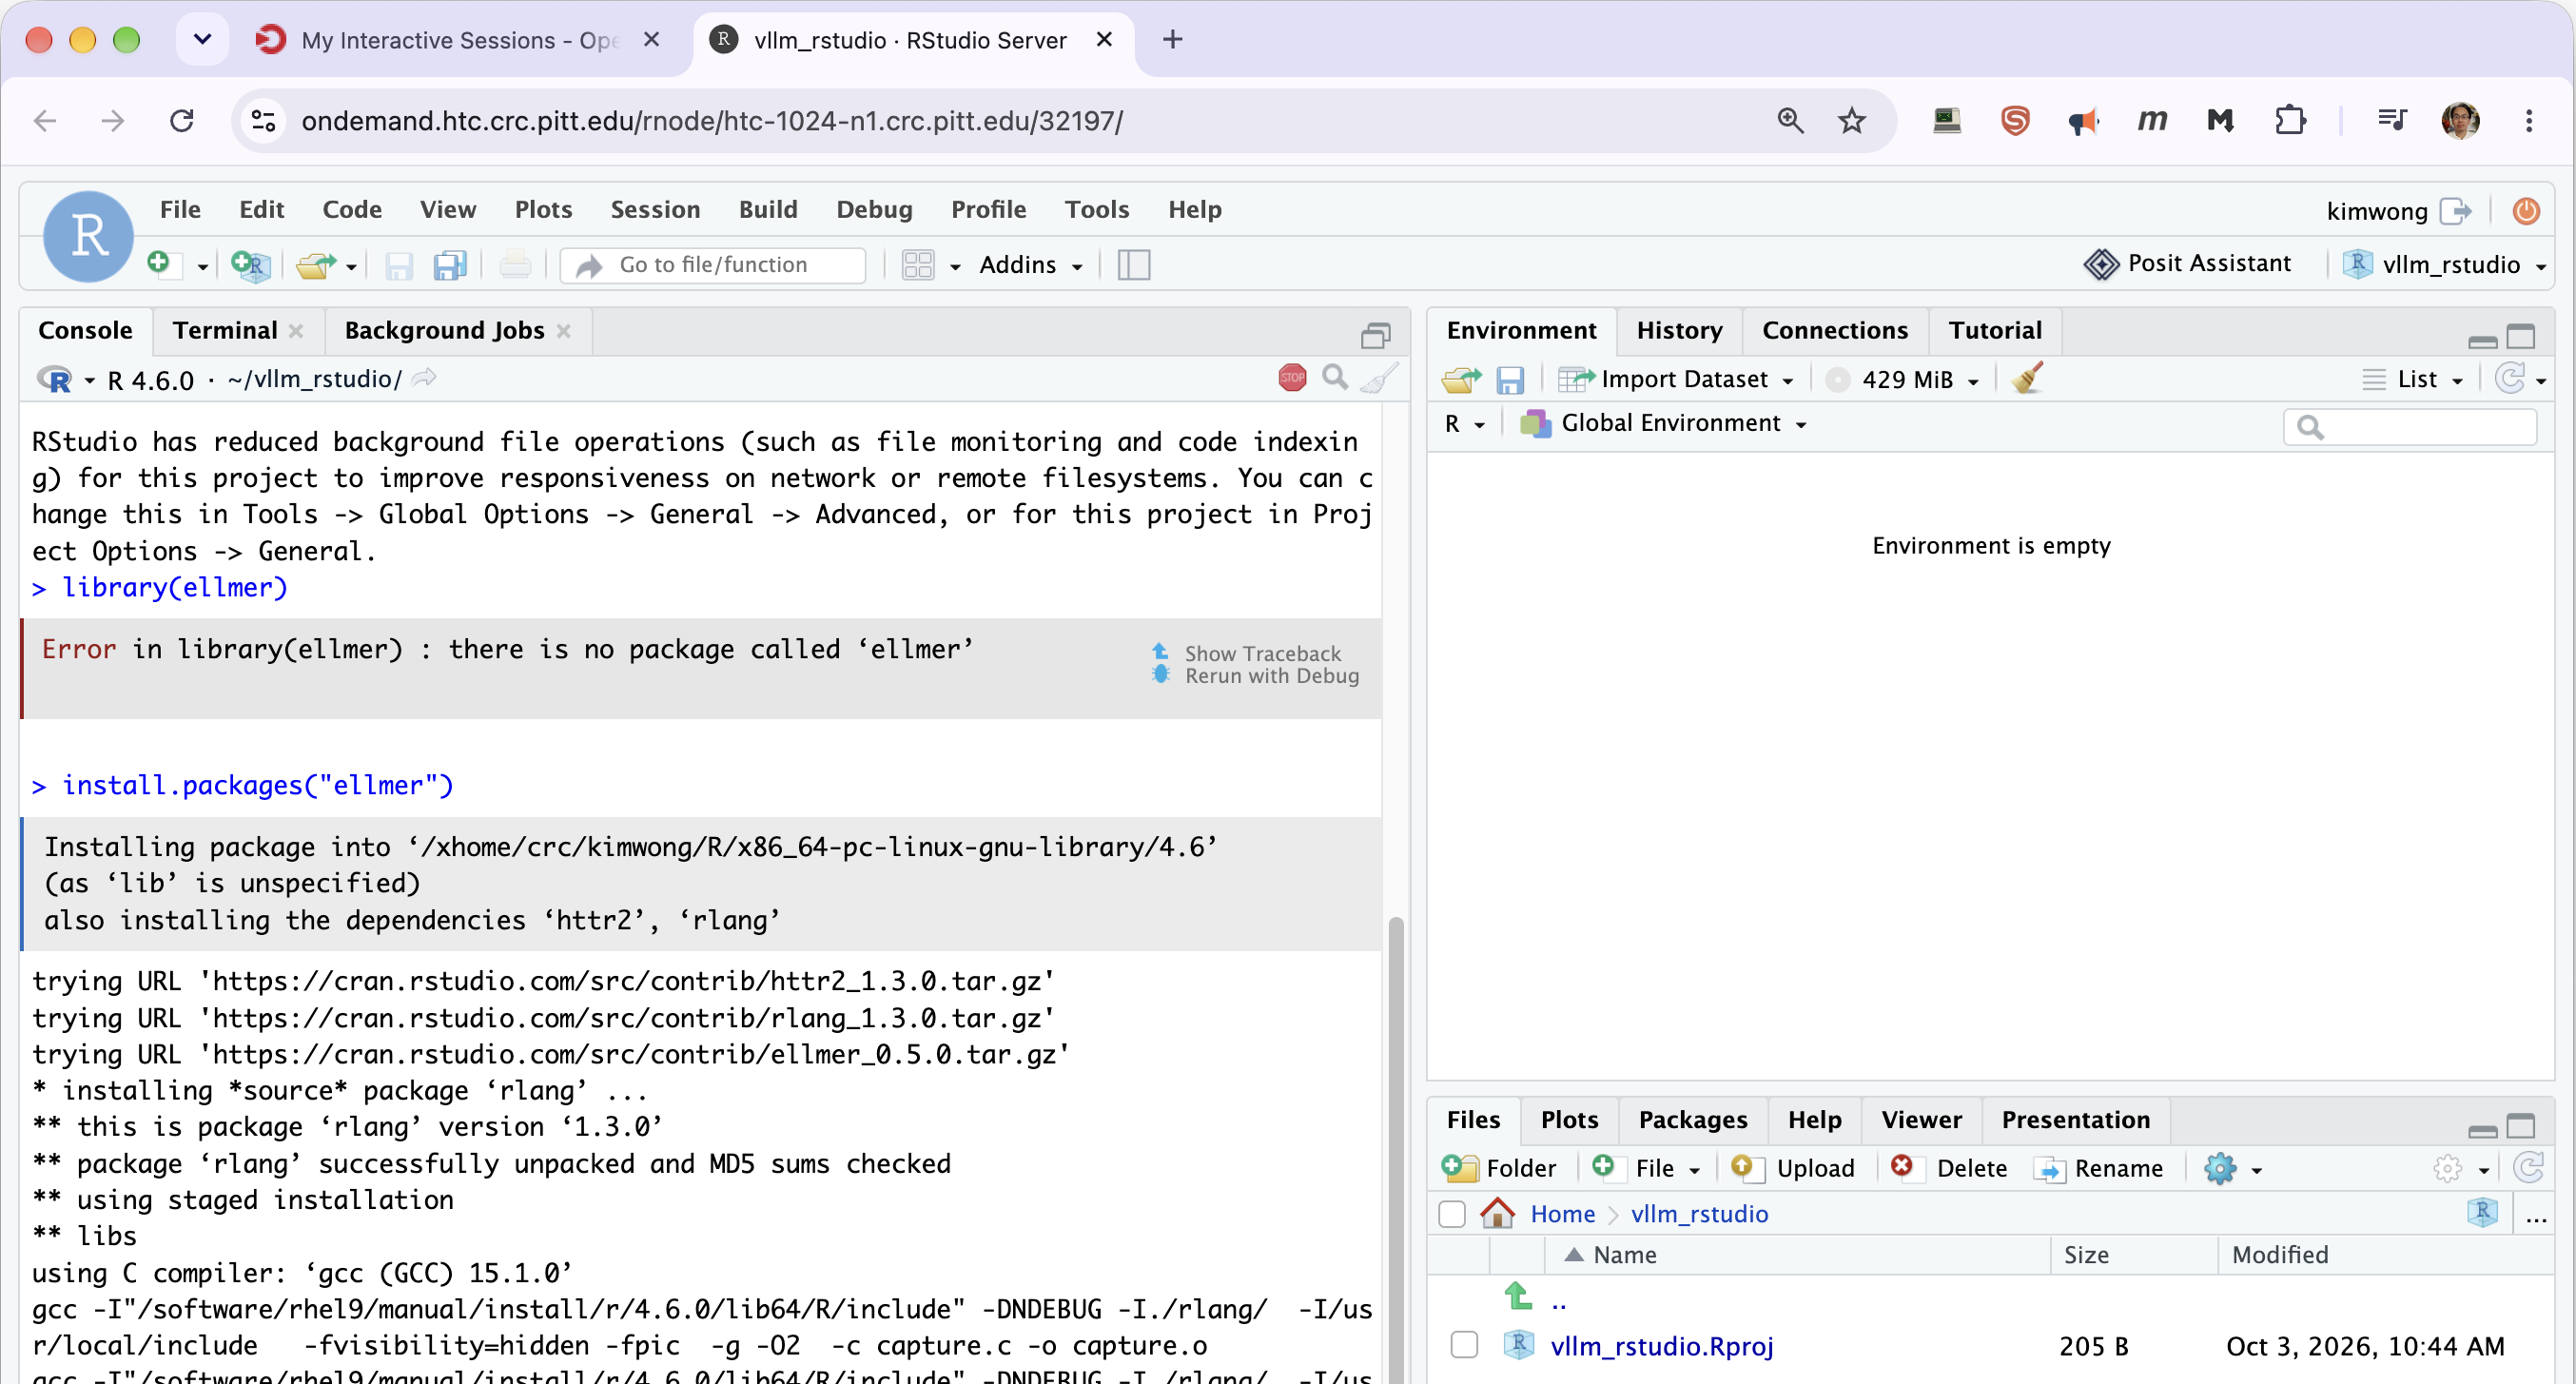
On CRCD this pulls in httr2 and rlang; the rest of the chain is already in the system
library. CRAN is configured site-wide, so the download works without any setup. Packages are
built from source rather than installed as binaries, so expect a few minutes of compiler
output scrolling past — that is normal, not an error.
Nothing to register. Unlike JupyterLab, R needs no equivalent of a kernel: the personal
library is on .libPaths() automatically in every later session on the same R version. Use
the Terminal pane beside the Console only if you prefer installing from a shell.
With the package available, point it at the address from Step 3:
library(ellmer)

# The server has no API key, but ellmer insists on one. Supplying it through the
# environment avoids the deprecated api_key argument.
Sys.setenv(OPENAI_API_KEY = "EMPTY")

chat <- chat_openai(
  base_url = "http://gpu-n64:60439/v1",
  model    = "meta-llama/Llama-3.1-8B-Instruct"
)
chat$chat("Where is the University of Pittsburgh?")
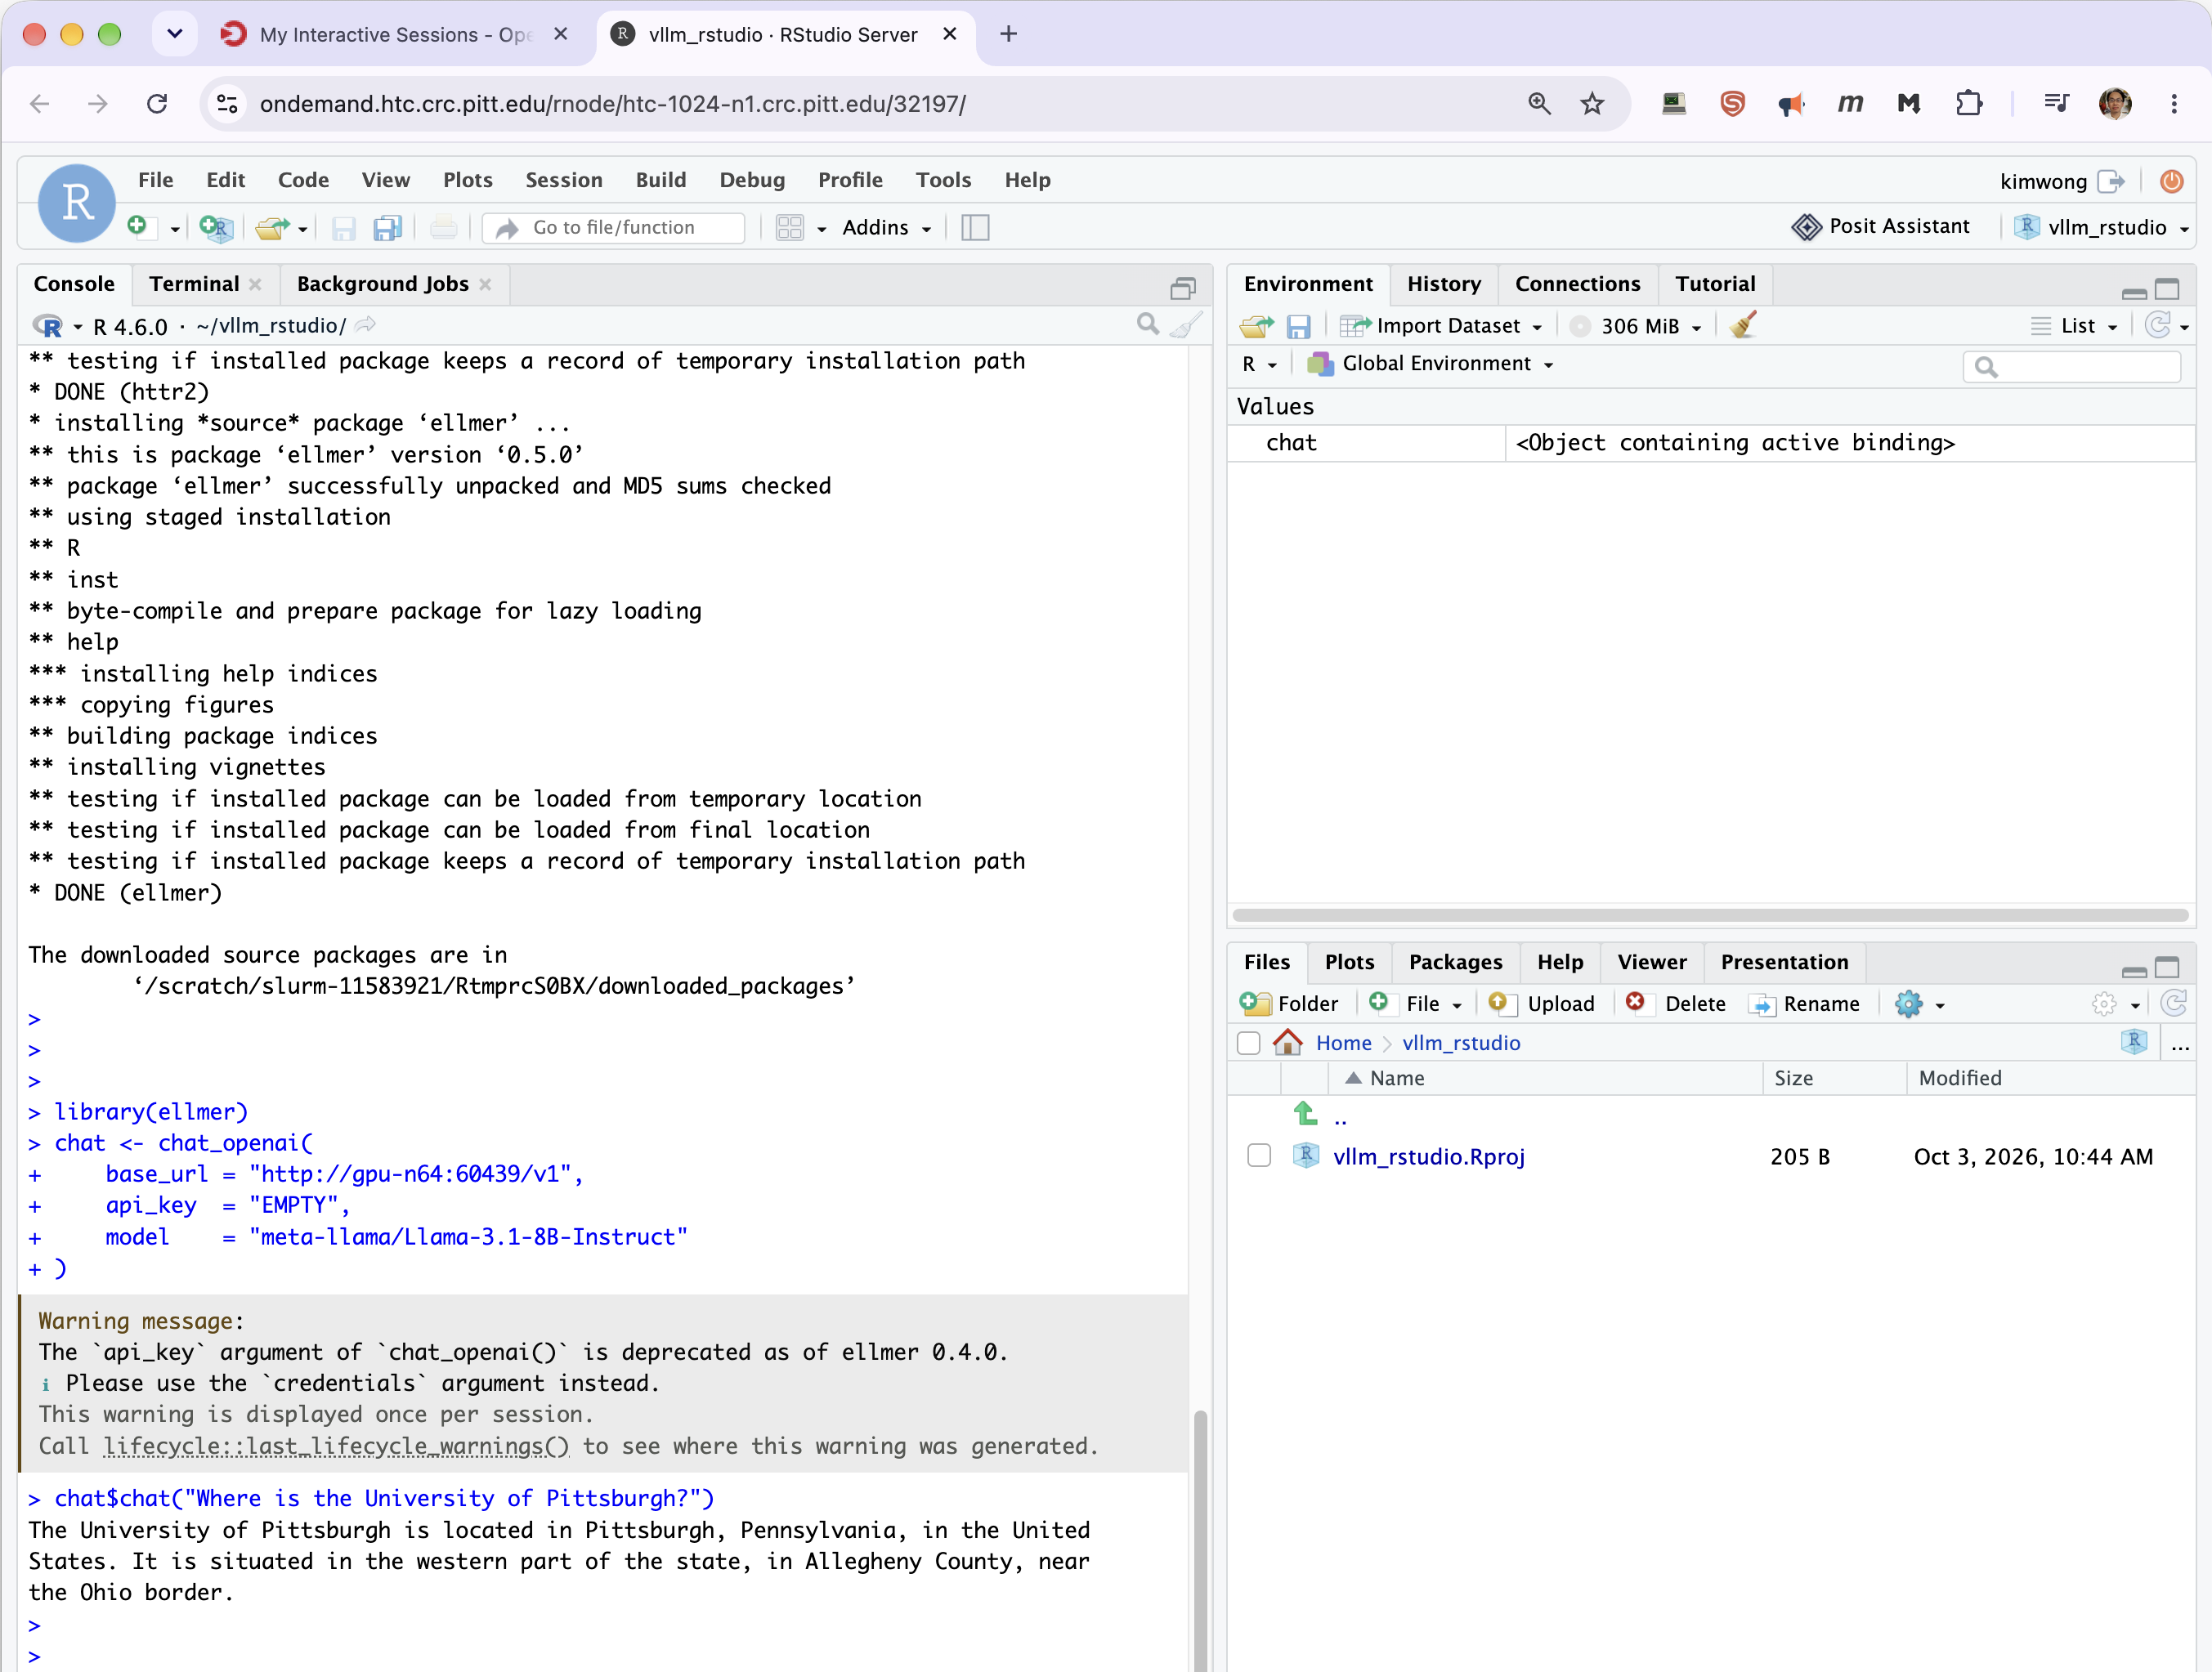
As with the notebook, the two halves sit on different clusters: the R session on an HTC node,
the server on gpu-n56. Cross-cluster access is what makes that work.
The key must be a non-empty string even when the server has no key set, hence the literal
"EMPTY". If you started the server with --api-key, use that value instead, reading it from
the token file named in the job's output.
Why not the api_key argument?
chat_openai() still accepts api_key, but as of ellmer 0.4.0 it is deprecated and warns
once per session:
Warning message:
The `api_key` argument of `chat_openai()` is deprecated as of ellmer 0.4.0.
i Please use the `credentials` argument instead.
The call works regardless. Setting OPENAI_API_KEY as above sidesteps the argument
entirely and stays quiet. credentials is the documented replacement if you prefer to pass
the key explicitly — check ?chat_openai for the form your installed version expects, since
this part of the ellmer API is still moving.
The server's variables are not in your R session
$VLLM_BASE_URL and friends exist only in the shell of the server job. An R session
inherits nothing from them. Either paste the address in, or have R look it up:
out <- system2("squeue",
               c("-M", "gpu", "--me", "--states=R", "-h", "-O", "NodeList,Comment"),
               stdout = TRUE)
out <- out[!grepl("^CLUSTER:", out) & nzchar(trimws(out))]
parts <- strsplit(trimws(out[1]), "\\s+")[[1]]
base_url <- sprintf("http://%s:%s/v1", parts[1], parts[2])
base_url
The CLUSTER: filter matters because squeue -M prefixes its output with a cluster header
line that -h does not always suppress.
Alternatives if ellmer will not install
Use httr2 directly. The endpoint is plain JSON over HTTP, so no LLM-specific package
is required:
library(httr2)

body <- list(
  model = "meta-llama/Llama-3.1-8B-Instruct",
  messages = list(list(role = "user", content = "Where is the University of Pittsburgh?"))
)

resp <- request("http://gpu-n64:60439/v1/chat/completions") |>
  req_headers(`Content-Type` = "application/json") |>
  req_body_json(body) |>
  req_perform()

resp_body_json(resp)$choices[[1]]$message$content
If install.packages() cannot reach CRAN, check getOption("repos") first. CRCD
configures a mirror site-wide and compute nodes can reach it, so an unset or overridden
repos option in your own .Rprofile is the more likely cause than a missing network
route.
If compilation fails on curl or openssl, the development headers are missing from
the session. Loading an R module that bundles them, or asking CRCD for a prebuilt binary,
is faster than fighting it.
See RStudio Server on the GPU Cluster for session options.
OnDemand can proxy any port on any compute node, so you can reach your server from a browser
without a tunnel. Build the URL from the node and port in Step 3, using /rnode/ and the
node's fully qualified name:
https://ondemand.htc.crc.pitt.edu/rnode/gpu-n64.crc.pitt.edu/60439/v1/models
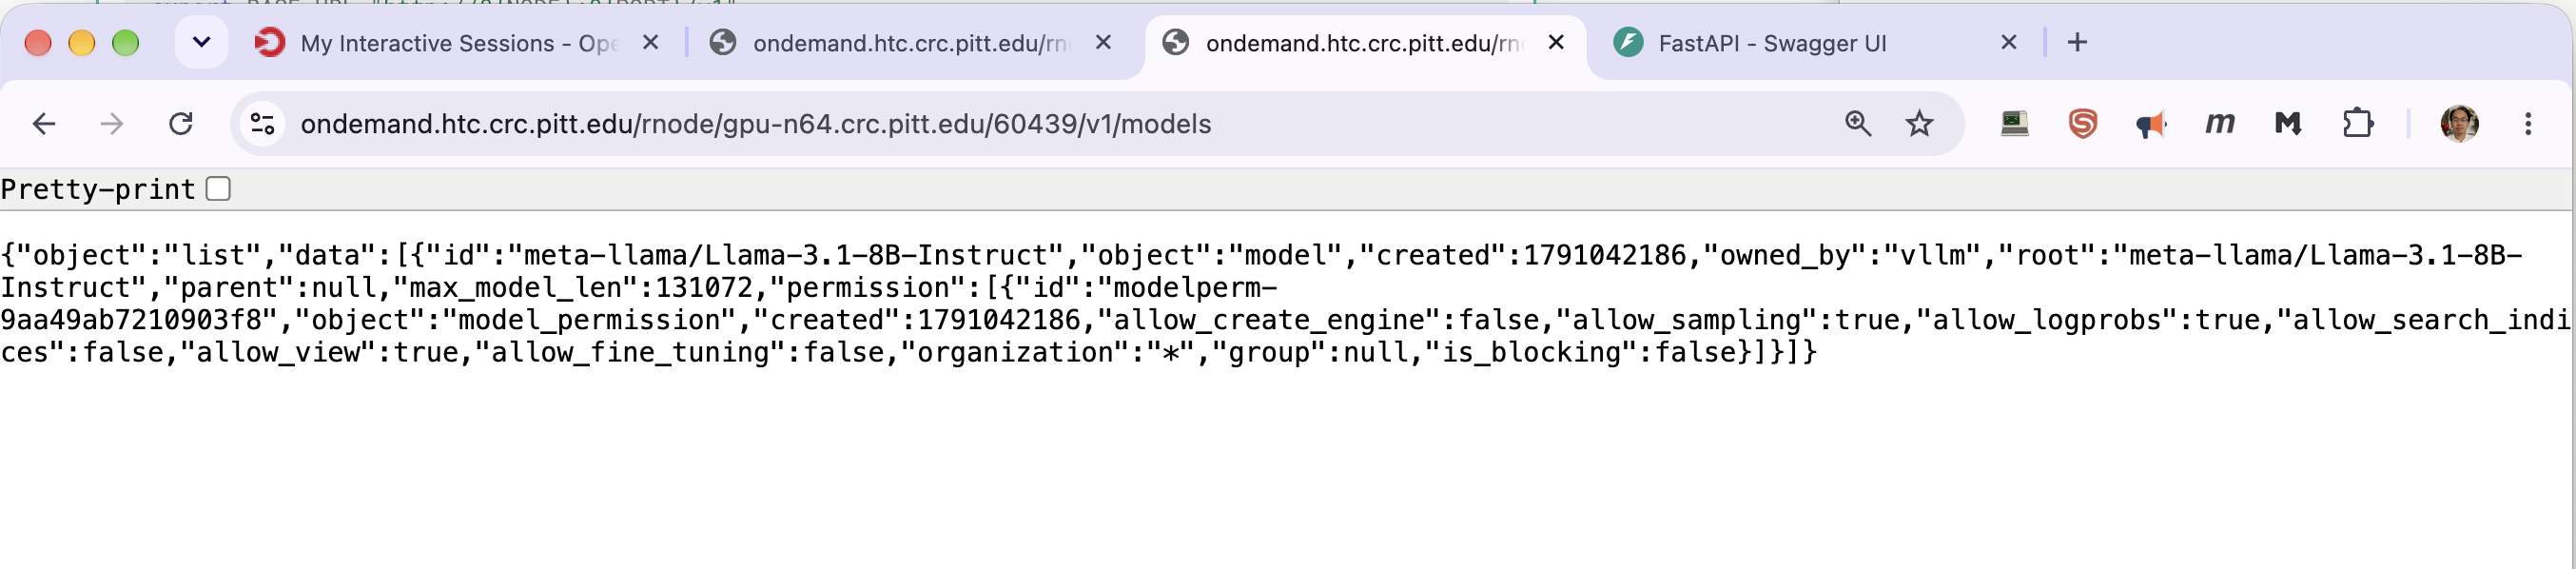
You must be logged in to OnDemand in the same browser for the proxy to authorize you.
Use /rnode/, not /node/
OnDemand exposes two proxy paths. /rnode/ is the one that works for an inference server
on CRCD; /node/ does not, even though you will see it in the address bar of OnDemand's own
Jupyter sessions.
The path matters too. vLLM serves no page at the root, so a URL ending at the port returns vLLM's own 404 body:
{"detail":"Not Found"}
That is a success signal for the proxy — OnDemand reached your server and the server replied. Add a real path:
| Path | What you get |
|---|---|
/v1/models |
JSON listing the served model, its max_model_len, and its permissions. The quickest confirmation that the server is up |
/health |
Empty 200 once the model has finished loading |
If the server was started with --api-key, a browser cannot send the authorization header, so
these paths return 401. Use curl from a cluster node instead, or run without a key when you
only want to poke at it from a browser.
Did not work: vLLM's /docs page
vLLM's interactive API documentation does not render behind the proxy. The page frame loads and then fails:
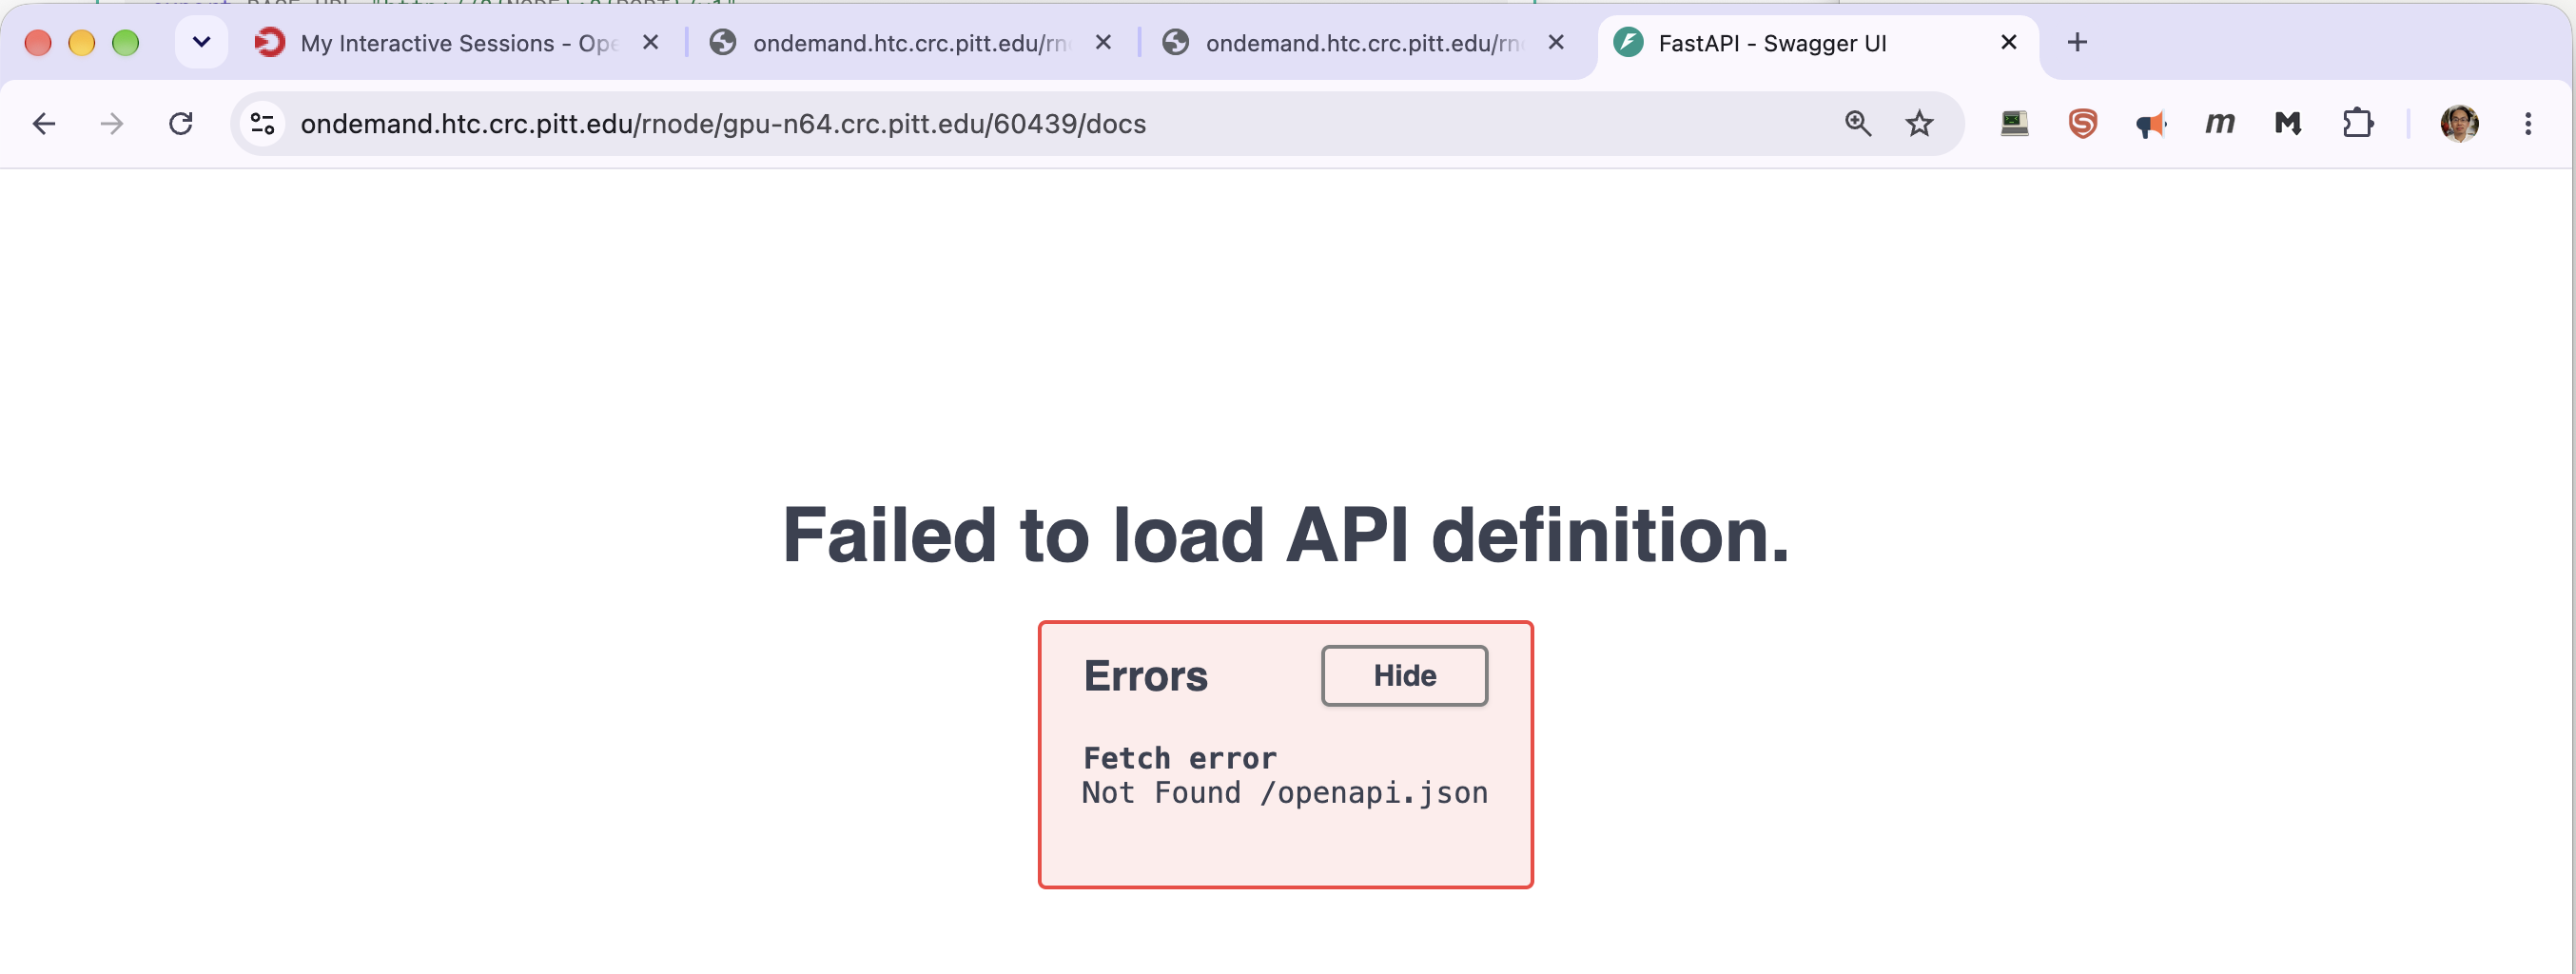
Swagger fetches its specification from /openapi.json at the domain root, which resolves to
OnDemand rather than to your server. /rnode/ does not fix this.
The page itself is fine — it is only the proxy's path prefix that breaks it. Over an SSH
tunnel there is no prefix and /docs works normally, so use that route if you want the
interactive documentation.
llama.cpp ships a chat interface, and it does render through the proxy — so this is the way to chat with a model from a browser with nothing installed locally. Point at the root path, keeping the trailing slash:
https://ondemand.htc.crc.pitt.edu/rnode/gpu-n79.crc.pitt.edu/27508/
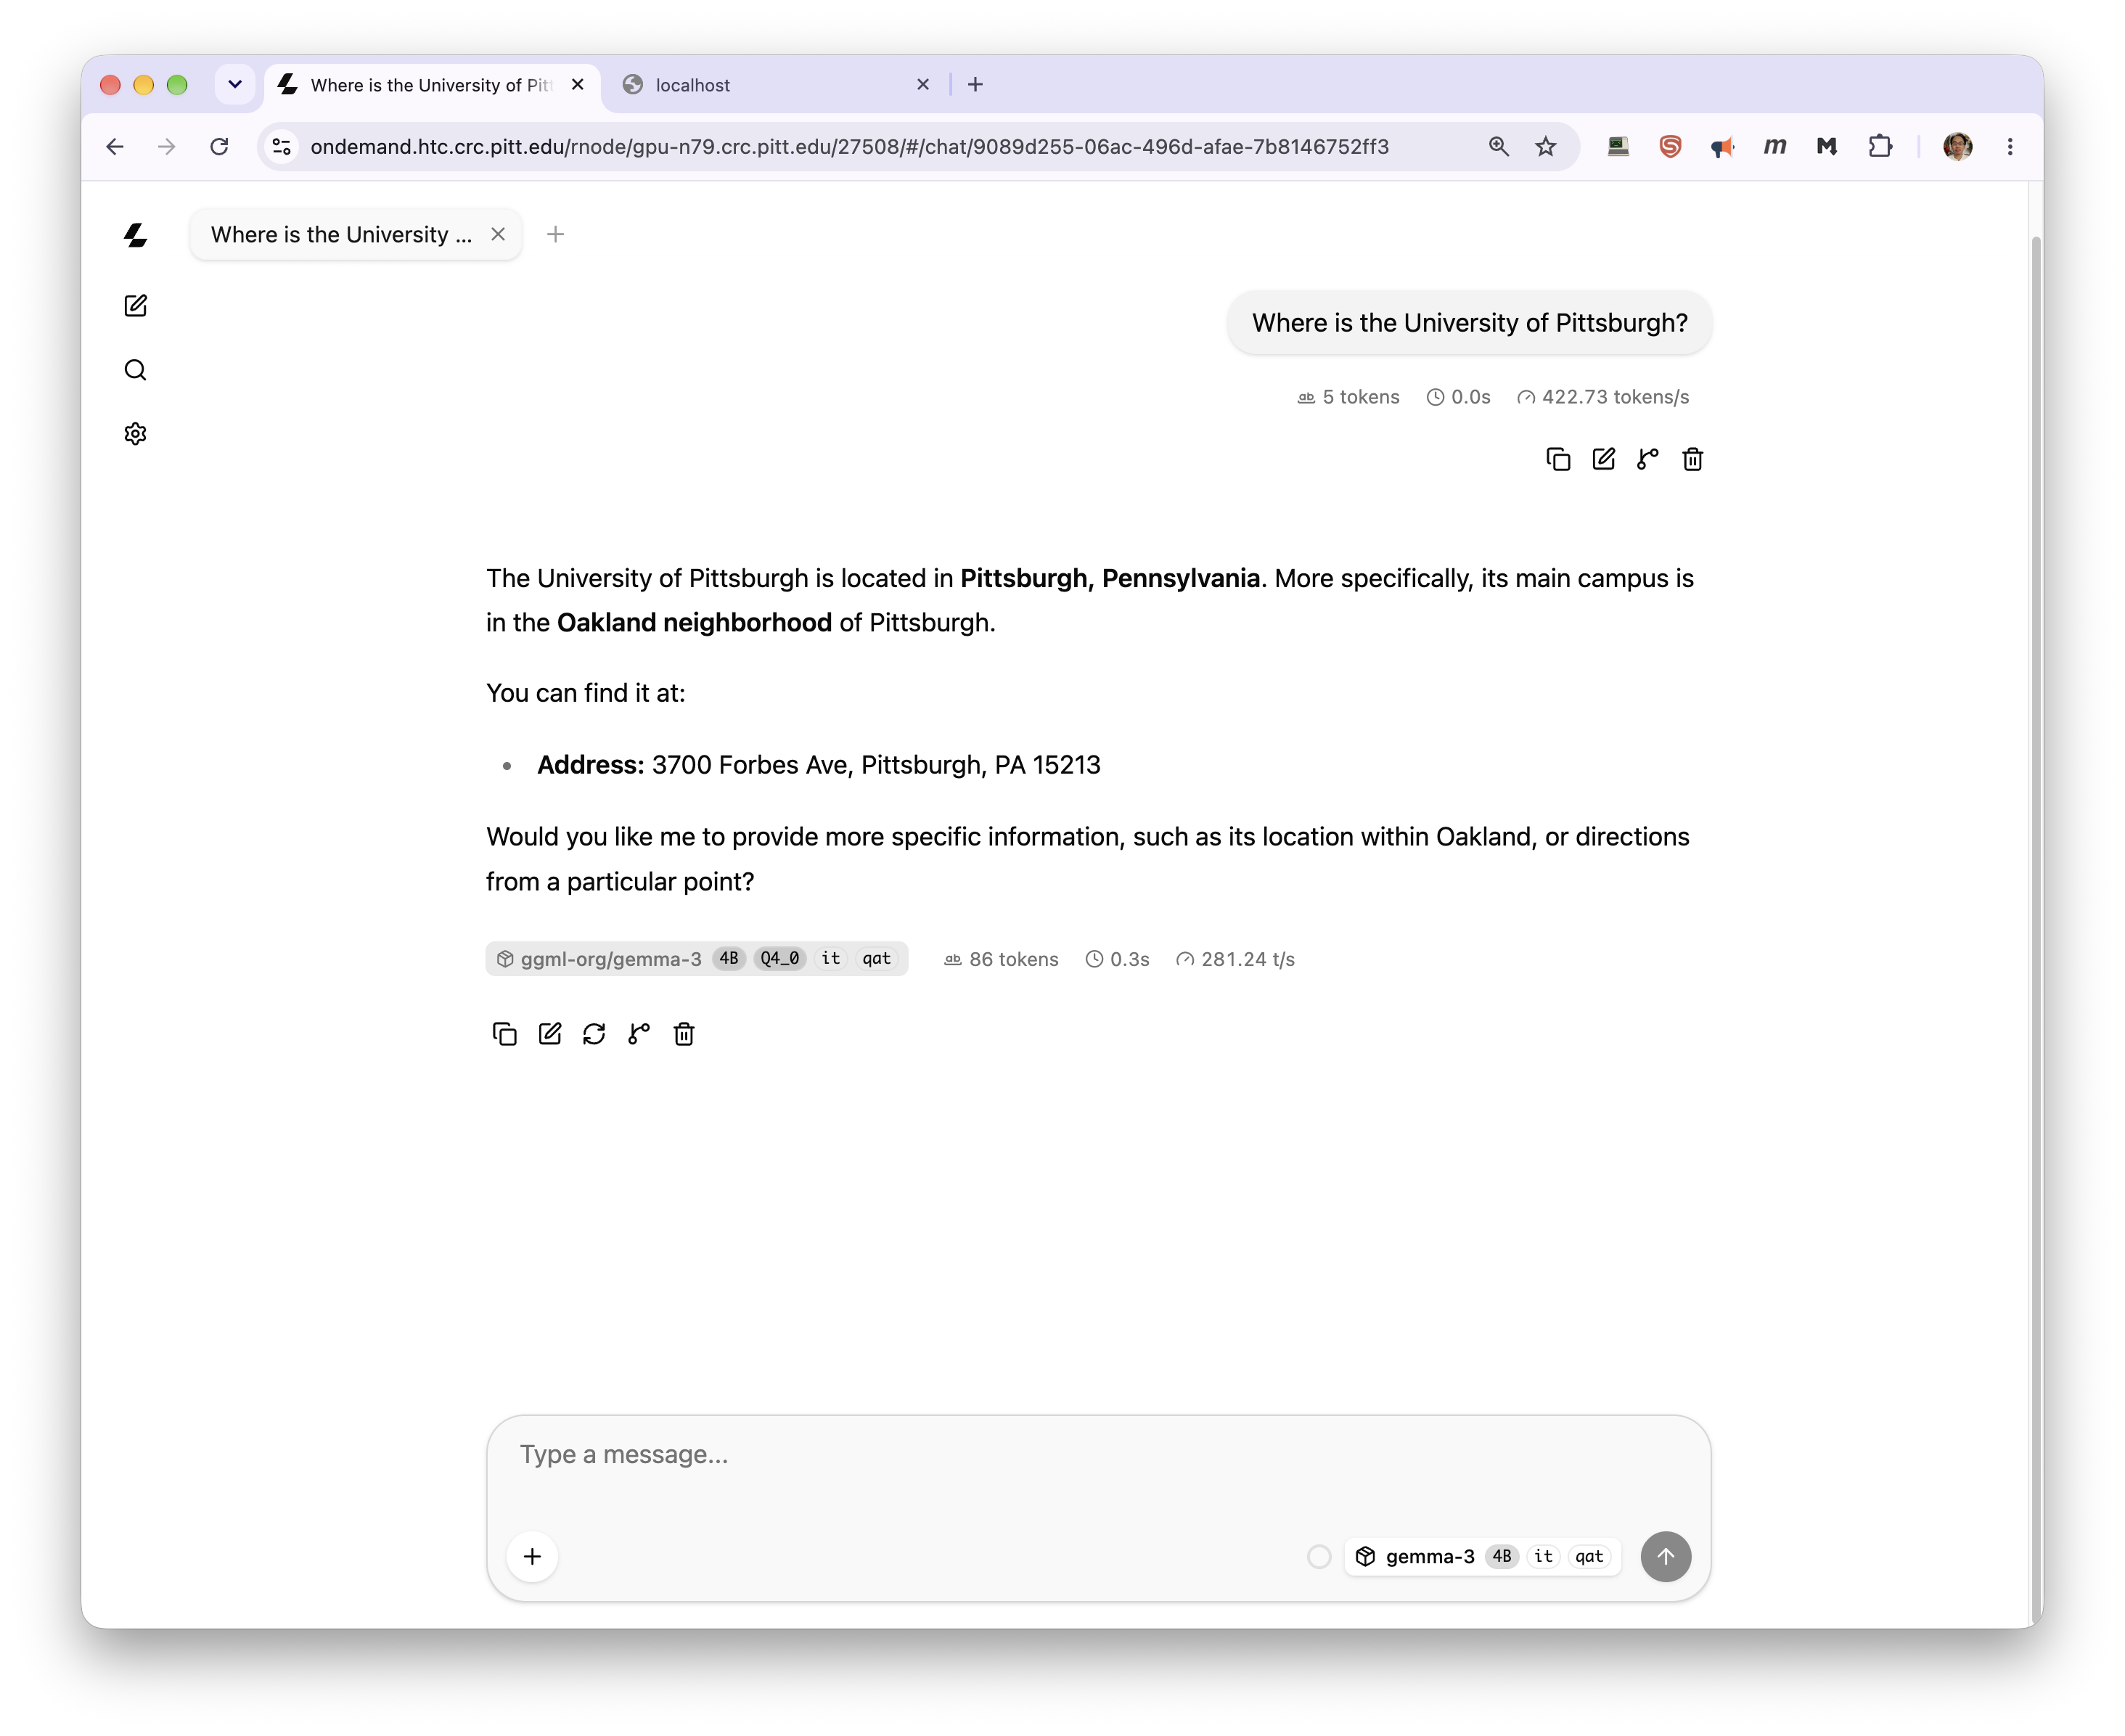
The model selector shows what the server has loaded, and each message is annotated with token counts and throughput:
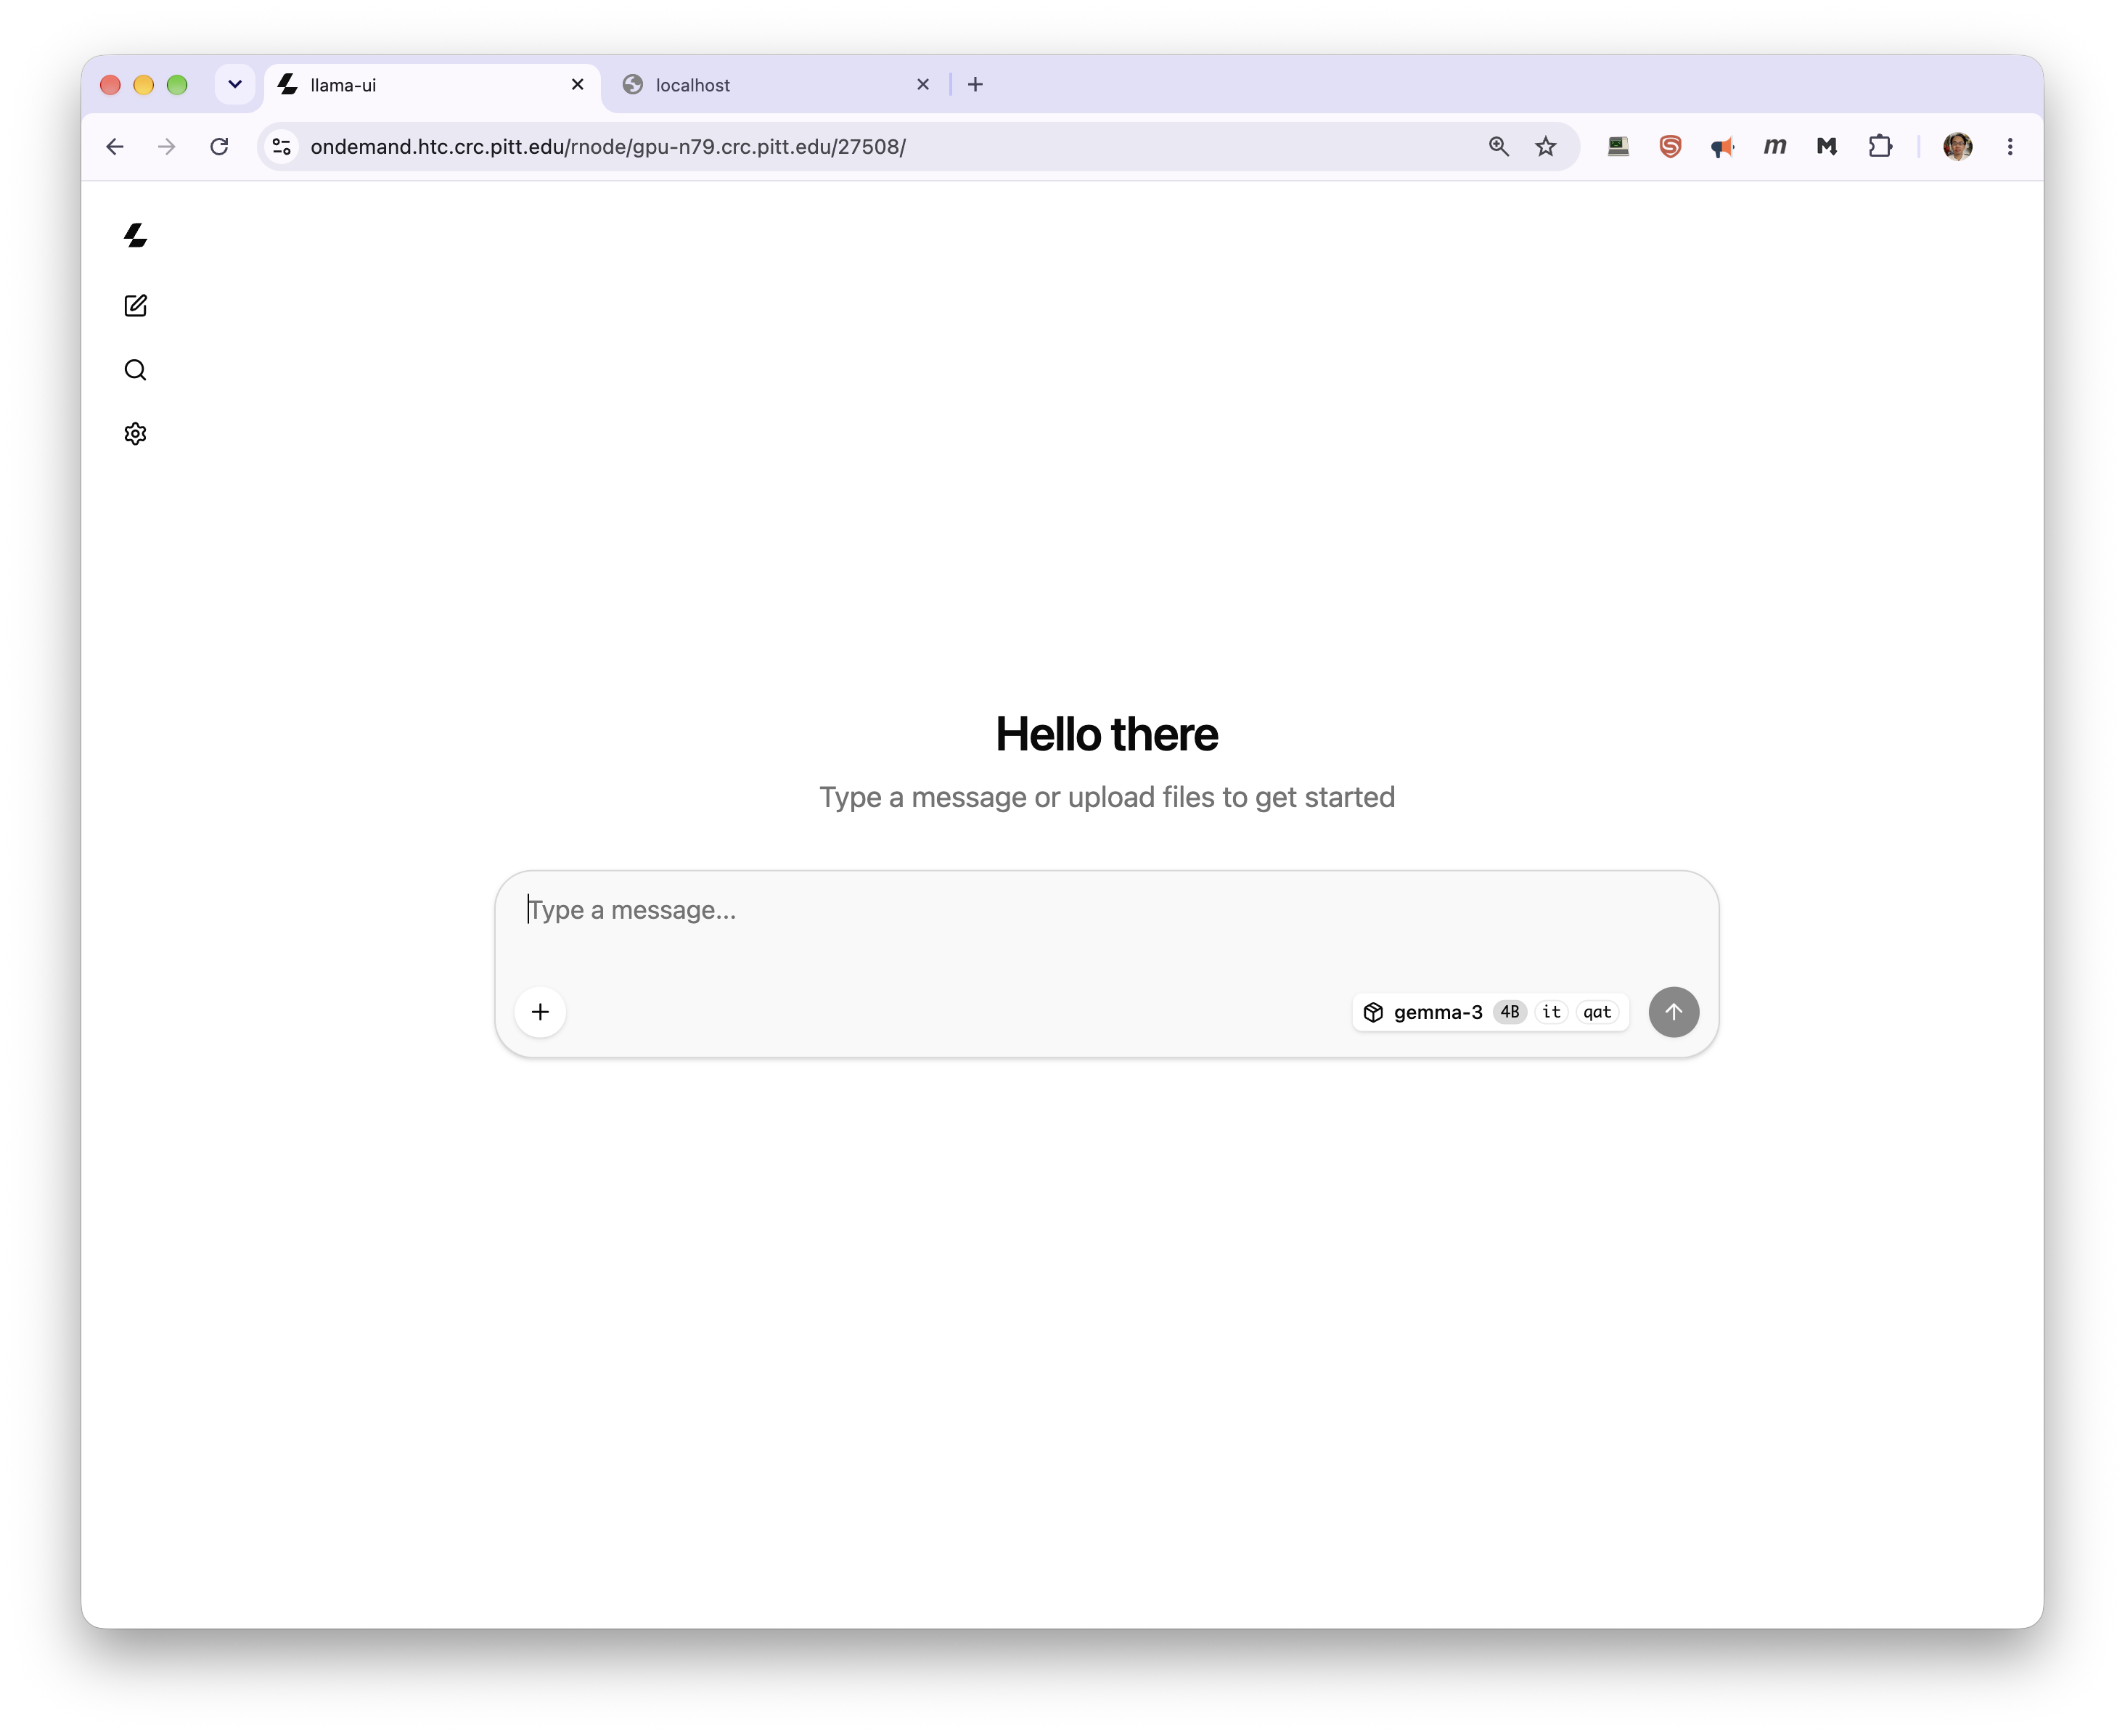
Keep the trailing slash
Without it the browser resolves the interface's asset paths one level too high and you get a
blank page. This is also why curl on the root is a poor test — llama.cpp answers a bare
GET / with 415 text/plain, which looks like a failure but isn't. Use a browser.
That interface has no authentication. Anyone logged in to OnDemand who knows your node and port can open the same chat window and spend your allocation.
Compute nodes aren't reachable from off-cluster, so forward the port through a login node.
Run this on your laptop, not on a login node. It opens a listening port on whichever machine you type it on, so running it on the cluster would only forward a port the cluster can already reach.
ssh -N -L 8000:gpu-n64:60439 <pittID>@h2p.crc.pitt.edu
Reading the arguments:
| Part | Meaning |
|---|---|
8000 |
A free port on your laptop. Pick anything above 1024; it needn't match the server's |
gpu-n56:53021 |
Your server's node and port from Step 3, resolved from the login node, which is why the compute node name works here |
h2p.crc.pitt.edu |
The login node doing the forwarding. This is a round-robin alias, so you may land on any of the login nodes |
-N |
Forward only, don't open a shell |
The command prints nothing and does not return — that is correct. Leave it running and open a second terminal for your work.
Check the tunnel by asking the server for its model list, either with curl or in a browser:
curl http://localhost:8000/v1/models
http://localhost:8000/v1/models
/v1 is a base URL, not a page
http://localhost:8000/v1 is what you give a client library as its base_url. Opening it
in a browser returns {"detail":"Not Found"}, because vLLM has no route at /v1 itself —
the same 404 you get from the bare root. That response still means the tunnel is working.
Append a real path such as /models.
A browser interface, with nothing to install. Over a tunnel there is no path prefix, so
vLLM's built-in API documentation at http://localhost:8000/docs loads and works:

Expand POST /v1/chat/completions, click Try it out, replace the placeholder request body, and click Execute. A minimal body:
{
  "model": "meta-llama/Llama-3.1-8B-Instruct",
  "messages": [{"role": "user", "content": "Where is the University of Pittsburgh?"}]
}
The model value has to match what /v1/models reports, and the sample body that Swagger
pre-fills uses "role": "developer" with "string" placeholders — replace them. It is an API
explorer rather than a chat window, but it needs no client library and no extra software.
The same tunnel also serves any desktop application that accepts an OpenAI-compatible endpoint:
point it at http://localhost:8000/v1 with the key EMPTY, or your real key if the server has
one.
You'll need to be on Wireless-PittNet or the University VPN for the ssh to connect at all.
Stop the tunnel with Ctrl+C when you're done; it dies with the server job in any case. See
SSH Connection Using a Terminal.
Claude Code is an agentic coding tool that reads and edits files and runs
commands. The claude-code module points it at a model you are hosting on a CRCD GPU rather
than at Anthropic's API.
It is the one client that sets up the server for you: load claude-code and it loads a
backend, starts it, and injects the flags that tool calling requires.
export CLAUDECODE_BACKEND="vllm"
export CLAUDECODE_VLLM_TOOL_PARSER="hermes"
export VLLM_MODEL="Qwen/Qwen2.5-Coder-32B-Instruct"
module load claude-code
claude
Load claude-code before the backend, not after
If you have already loaded vllm or llamacpp in this session — following Step 2, for
instance — unload it first. claude-code can only inject the tool-calling flags before the
backend server starts, and without them Claude Code cannot use tools at all.
Full reference, including the tool-call parser table: Claude Code on CRCD.
With a Remote-SSH session on the cluster, VS Code forwards ports from the remote host
automatically. Open the Ports panel, add the server's port, and reach it at
localhost:<port> on your machine. See VS Code.
Step 5. Stop the server
A server job holds its GPU and bills service units for the full walltime whether it's answering requests or sitting idle. GPU jobs are billed per card, so an idle 8-card server is expensive. Cancel it as soon as you're done:
scancel -M gpu 1230409
Set --time to what you actually need rather than the maximum. For a long-running service, it's
usually cheaper to relaunch on demand than to hold a card overnight.
Keeping your endpoint private
All ports are open within the CRCD environment, which is what makes cross-cluster clients easy — and it also means any user on any cluster could send requests to an unauthenticated server. Your allocation pays for their tokens, and your prompts and completions pass through a process they could query.
- Always set an API key where the server supports one. For vLLM, export
VLLM_API_KEYbefore loading the module. Put llama.cpp and Ollama behind a key-checking proxy if the endpoint matters. - Generate the key per job rather than reusing a fixed string, as the templates above do.
- Store it in a file with restrictive permissions, not in a script or a notebook cell. The
templates write it to
~/.crcd_inference/token_<jobid>and delete it when the job ends. - Don't serve models or data with licensing or privacy restrictions without confirming the terms. For restricted data, contact CRCD before you begin.
Don't pass the key as a command-line flag
vLLM also accepts --api-key through VLLM_EXTRA_ARGS, and it works — but the key then sits
in the process's command line, where anyone who can list processes on that node reads it:
[kimwong@gpu-n79 ~]$ ps -eo pid,user,args | grep -- '--api-key'
1850563 kimwong  /usr/bin/python3 /usr/local/bin/vllm serve meta-llama/Llama-3.1-8B-Instruct \
         --port 52615 --host 0.0.0.0 --download-dir /vast/crcd/kimwong/vllm --api-key gopitt
VLLM_API_KEY keeps it out of the process table. Both enforce the key identically —
unauthenticated requests get {"error":"Unauthorized"} either way.
Rejected requests show up in the log
vLLM records the source address of every request, so $VLLM_LOGFILE tells you whether anyone
else has been probing your endpoint:
INFO:     10.201.0.25:49632 - "GET /v1/models HTTP/1.1" 401 Unauthorized
INFO:     10.201.0.25:38664 - "GET /v1/models HTTP/1.1" 200 OK
Troubleshooting
| Symptom | Likely cause | What to do |
|---|---|---|
Job stays PD with (Resources) |
Requested partition is busy | Target a partition with more free cards, or fewer GPUs |
Job stays PD with AssocGrpBillingMinutes |
No allocation or expired | Submit a Service Request Form |
Connection refused from a client |
Server still loading, or bound to localhost | Check the job output; confirm --host 0.0.0.0 |
CUDA out of memory at startup |
Model too large for the cards | Fewer layers, a quantized model, more GPUs, or a larger-VRAM partition |
Empty Comment from squeue |
Job hasn't reached the scontrol update line |
Wait a moment and rerun; check the output file for errors |
must be run inside a SLURM allocation |
Loaded the vllm module on a login node |
Start an interactive session or submit a batch job first |
No GPU is visible to this job |
Allocation has no GPU attached | Add --gres=gpu:1; an HTC or SMP session cannot host the server |
mount source ...\.cache/huggingface doesn't exist |
First-ever use. The module binds ~/.cache/huggingface on every launch, whether or not VLLM_DOWNLOAD_DIR is set |
mkdir -p ~/.cache/huggingface, then load the module again. The templates do this for you |
VLLM_MODEL looks like a local path but no such directory exists |
Wrong path, or storage not mounted on the node you landed on | Confirm the path is readable from inside a job, not just from a login node |
Server serves facebook/opt-125m |
VLLM_MODEL unset, or set after the module load |
Export it first, then module unload vllm && module load vllm/0.29.0 |
| Batch job ends seconds after starting | Script fell off the end; the module backgrounds the server | Block on $VLLM_PID as the templates do |
vllm-status reports still starting |
Normal for large models | Wait; check $VLLM_LOGFILE for progress |
{"error":"Unauthorized"} from vLLM |
Missing or wrong API key | Send Authorization: Bearer <key>; compare against the token file named in the job output |
{"detail":"Not Found"} in a browser |
Connection succeeded; vLLM serves no page at / or /v1 |
Append a real path, e.g. /v1/models. Through the OnDemand proxy, also check you used /rnode/ |
| Server vanished mid-session | Walltime expired, or job was preempted | Check sacct -M gpu -j <jobid>; avoid preemptible partitions |
If you're stuck, submit a help ticket and include the job ID and the job's output file.
Related
-
Pick a GPU
Per-partition cards, VRAM, cores, and
--constraintvalues. -
vllm module reference
Every
VLLM_*variable,vllm-status, andvllm-stop. -
Ollama specifics
Pulling models, and the R and Python clients CRCD has preinstalled.
-
What a job costs
GPU jobs are billed per card for their full walltime.
-
Bring your own server
Build a container for a framework CRCD doesn't provide as a module.